
Or, How I Add New Stuff to My Library
In this post, I talked about how I’ve reached Digital Scrapbooking Supply Nirvana, where I can see what I have, find what I need, and use it all when and how I want.
It’s probably easiest to explain how I organize my supplies by walking you through my workflow. Of course, it takes way more time to write it out than it does to actually do it.
And for those of you who like the read the end of the book first, you can check out this post where I show you how I find and use what I have. It’s the payoff to the work that happens here.
My Workflow: An Overview
I’ll go into step-by-step detail of how I take a ZIP file of new supplies and bring them into my Digital Element Library. At a high level, though, here’s what I do:
- Save time by extracting everything at once with a tool called ExtractNow.
- Consolidate all supplies for a kit or collection into a single folder.
- Prepare for import to Lightroom by deleting unnecessary files, filing Photoshop tools, and converting PNGs to TIFF; save time in the process by using Bridge to work on all files at once.
- Import the folders of JPG, TIFF, and PSD files into Lightroom.
- Add basic keywords to all files in a kit for designer, kit code, and kit name.
- Tag preview images as previews for later detailed keywording.
- Move all files into designer’s folder.
- Remove alpha images from Lightroom (for speed).
- Add detailed keywords for theme and color to preview images only.
That’s all! Here’s how I do it:
1. Extract everything at once
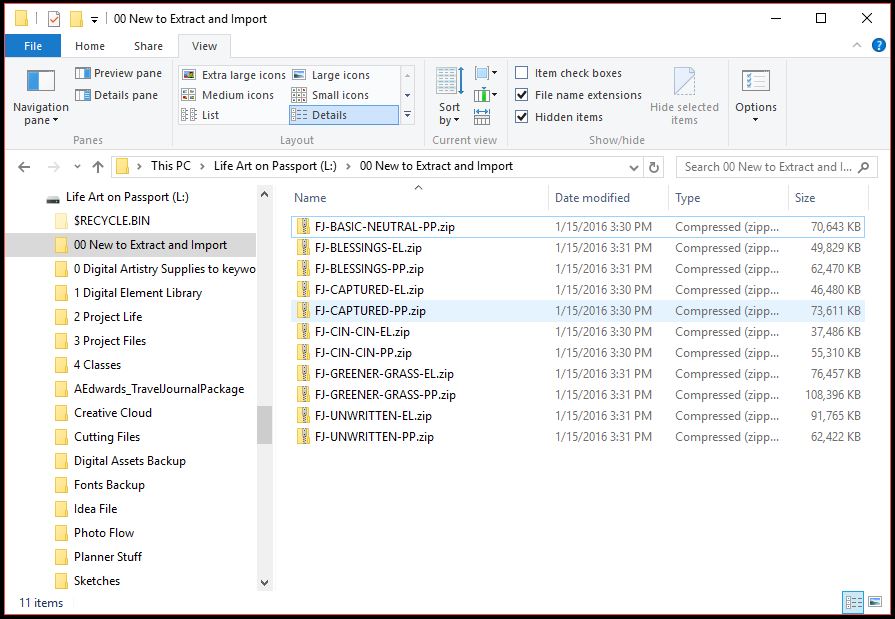
After downloading new supplies, I move the ZIP files to folder L:\00 New to Extract and Import. I usually let them pile up until once or twice a month (unless I need to use the supplies RIGHT NOW, which can happen).
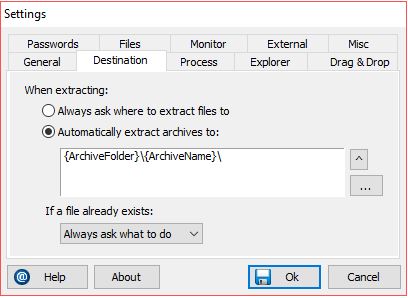
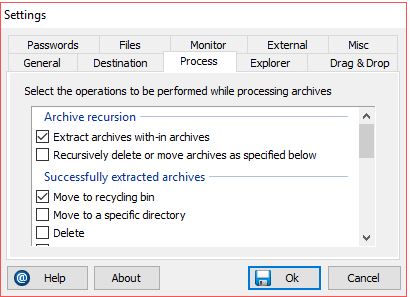
I use ExtractNow to unpack all ZIP files at once. I have the tool configured to extract each ZIP into a folder named with the archive name and then delete the original ZIP file automatically. All I have to do is drag and drop and click EXTRACT.
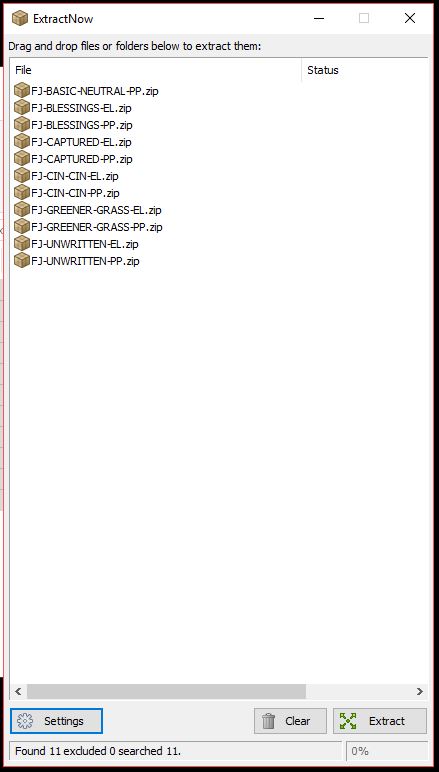
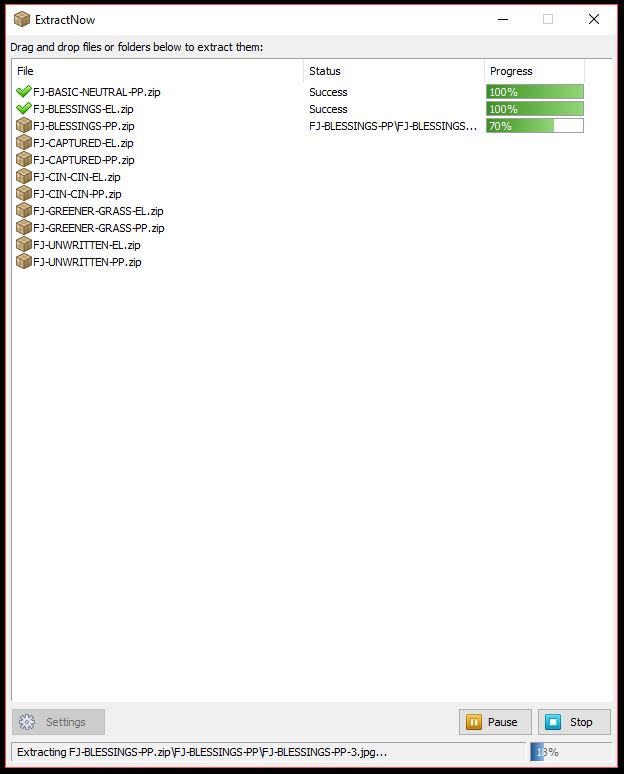
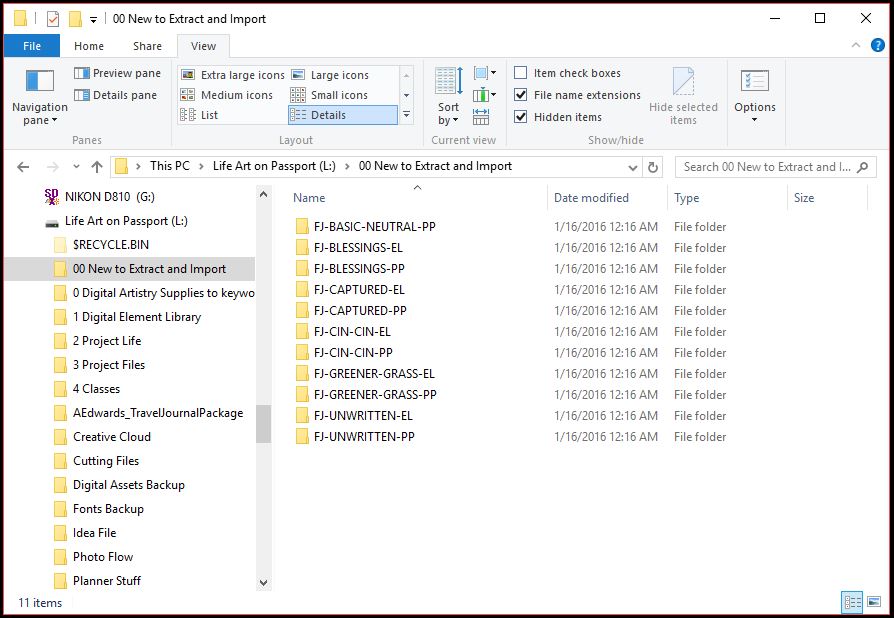
When ExtractNow is finished, this is what I’m left with:
2. Consolidate, convert, and prepare for import
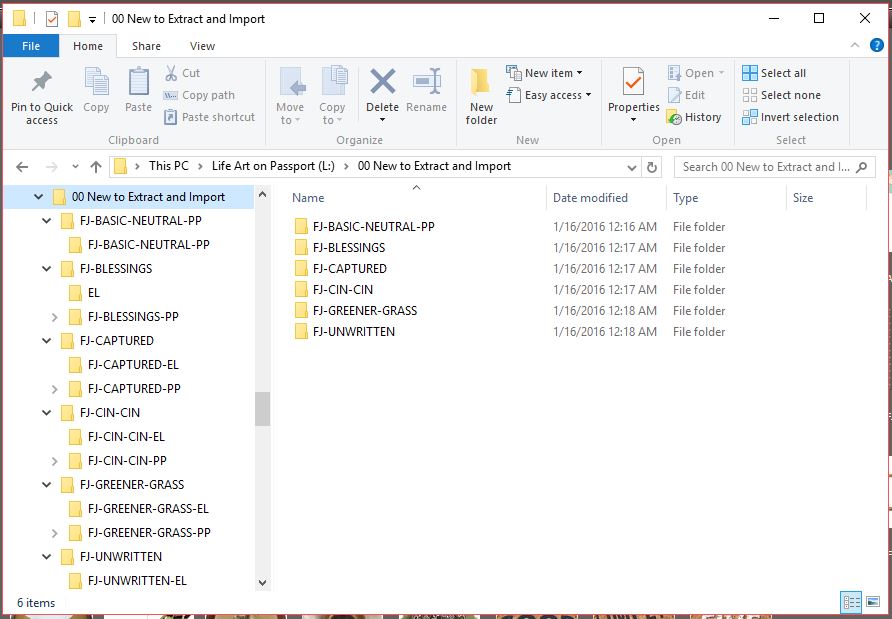
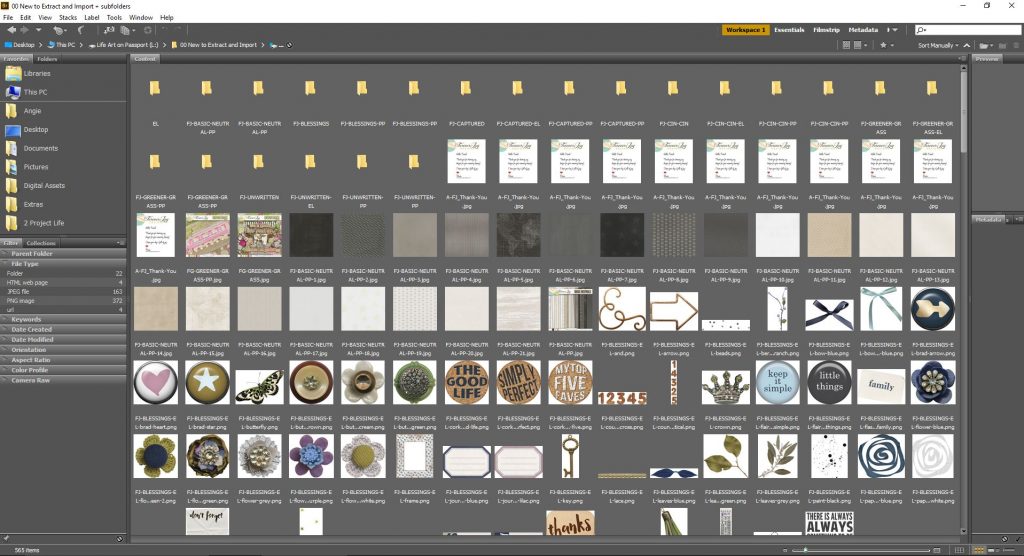
Many kits are divided into multiple downloads due to file size. That means multiple zips, and after ExtractNow, multiple folders. So next, I merge all kit folders into a single folder – for example, FJ-BLESSINGS-EL gets dragged into FJ-BLESSINGS-PP, which is then renamed FJ-BLESSINGS. When I’m done, it looks something like this:
Then I open Adobe Bridge, navigate to folder L:\00 New to Extract and Import and activate View All Files in Subfolders. This can take it a little while to pull everything up if I’ve got a lot of supplies to import. It’s going through every file in every folder, indexing them, and displaying them so I can work with them all at once.
Show all TXT, RTF, DOC, PDF, LINK, PAGE, HTML, and GIF files by using the selectors in the left hand File Type pad. Press CTRL+A to select them all … then, press Delete.
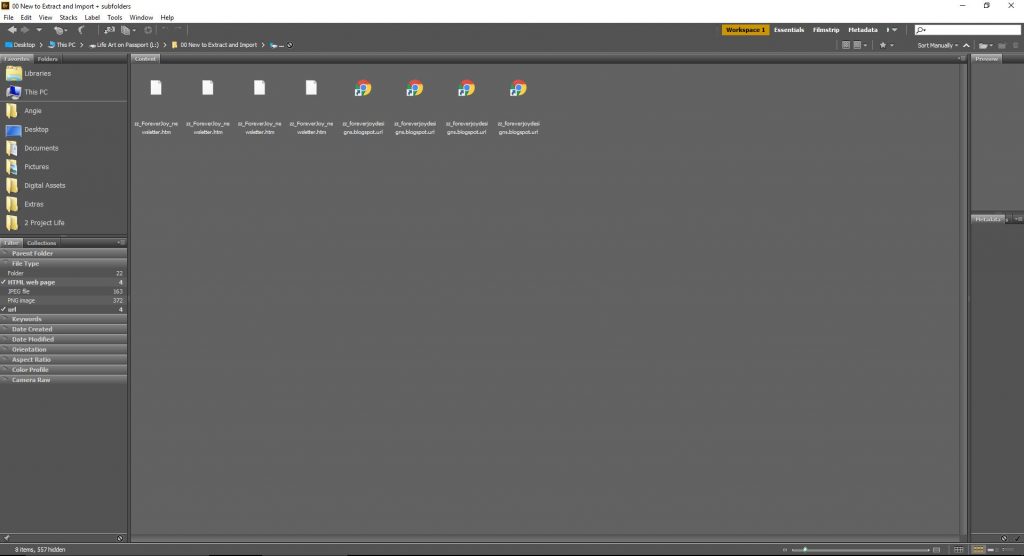
Yes, I know that includes the Terms of Use files. And the links to designer stores. And their cute little blinkies. I know they put time into creating them, but … well, unless I’ve stored it in my Commercial Use folder structure, I assume these are all for personal use. And I know how to use Google to find their stores again. It’s all about simplification for me!
If there are any brush files (.ABR), style files (.ASL), action or script files, shape files, cut files, or any other similar tools, I move them to the appropriate folder on my internal hard drive. I find Photoshop tools generally run faster when they’re on an internal drive rather than an external one. My folder structure for that looks like this:
E:…\Digital Assets
PS actions
PS brushes
PS patterns
PS scripts
PS shapes
PS styles
I use a tool called Preset Viewer Argus by TumaSoft that lets me see real-time previews of those files in the Preview pane of File Explorer. Easy peasy!
Once I’ve cleared out all the other file types, it’s time to convert all the PNG files to TIFF files. Wait, what?!? I know, it sounds intense, but it’s an easy batch command. TIFF files can store keyword information in metadata, but PNGs can’t*. And since I don’t like the idea of potentially losing all the work I’ve done keywording if something happens to my software, I convert them.
But Angie, you say, I import PNGs into Lightroom all the time and add keywords and it saves them. Yes, that’s true, but the keywords aren’t saved on the PNG file. They’re saved in your Lightroom database. So you can only search by keyword in Lightroom, not in File Explorer or other apps, and if something goes wrong with your Lightroom database, you’ve lost all that work. That’s why I convert to TIFF.
Here’s how to run the PNG to TIFF conversion with just a couple clicks:
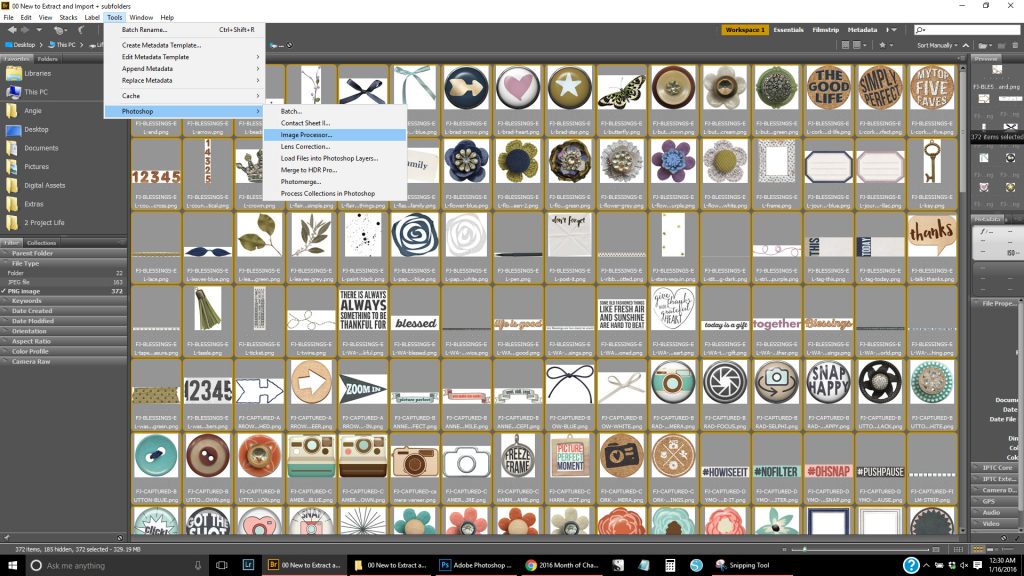
Select PNG image from the Filter pad on the left. All the PNG files will appear.

Press CTRL+A to select all the PNG files.
Navigate to Tools … Photoshop … Image Processor. Photoshop will load and the Image Processor window will appear.
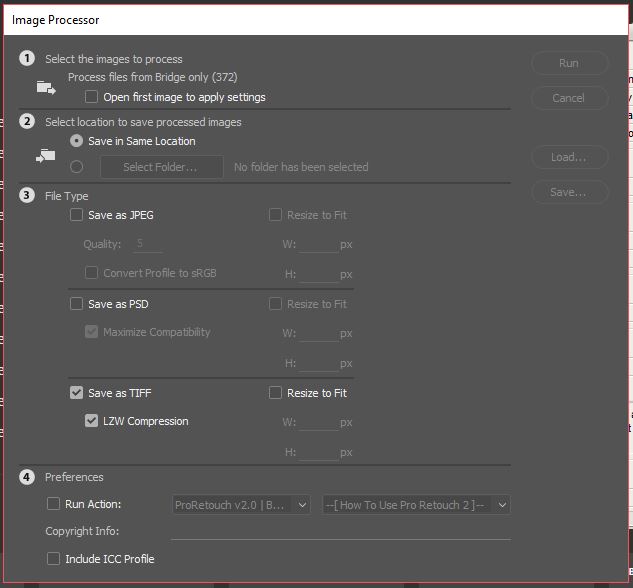
Choose Save in Same Location, Save as TIFF, with LZW Compression, and click OK. Then walk away and get a cup of coffee. Photoshop will turn all the PNGs into transparent TIFF files.
WARNING: Be careful – you now have both PNG and TIFF files. Back in Bridge, you want to delete all PNGs. If not, you’ll import into Lightroom and have two of all those files. (Been there. Done that. Said the bad words.) For my peace of mind, I’ll often navigate to View … Refresh in Bridge and make sure that my TIFF count has now increased by the number of PNGs, just to be safe.

But then I delete ‘em.
3. Import into Lightroom
Now that all the files are prepped, close Bridge and launch Lightroom. Click IMPORT, choose all files in L:\00 New to Extract and Import and ADD. Let it do its thing.
4. Add basic keywords
On my first pass through Lightroom, I quickly add keywords for designer name, a kit code nested beneath the designer name, and the kit name. It’s fast – here’s how I do it:
- Click on a kit folder. Press CTRL+A to select all the files in the folder.
- Right-click the folder and choose Rename. Press CTRL+C to copy the folder name, then press ESC to close the dialog box.
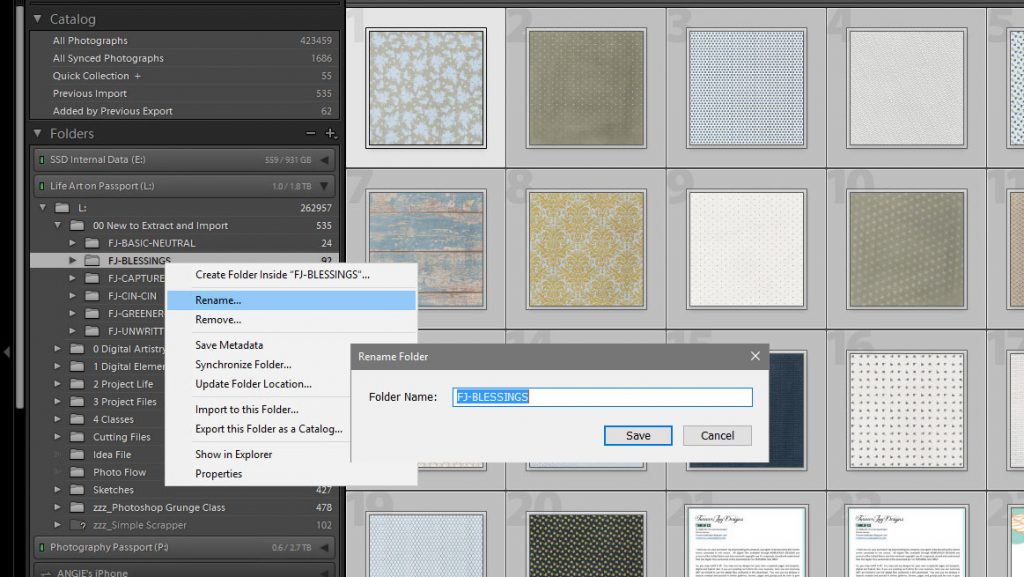
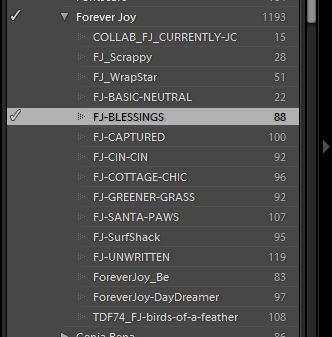
- Add the designer name keyword. I keep it nested under 00. Life Art Keywords -> 9. Designers -> Designer; I right-click the designer in my Keyword List and choose Add This Keyword to Selected Photos. (ex: Forever Joy)
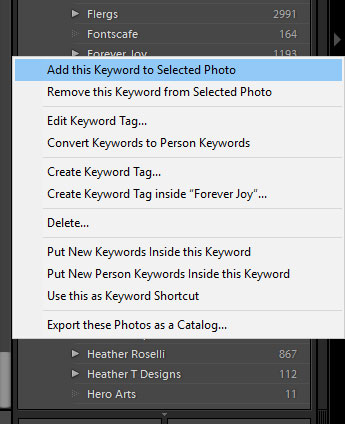
- Now, create the kit code under the designer. Right-click on the designer name keyword and choose Create Keyword Tag inside “designer-name”.
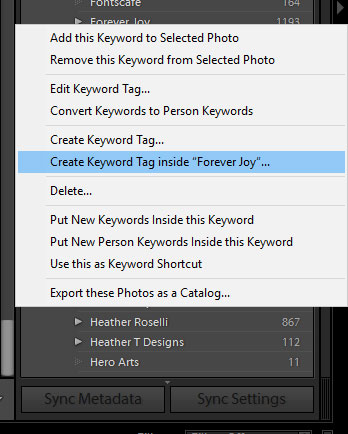
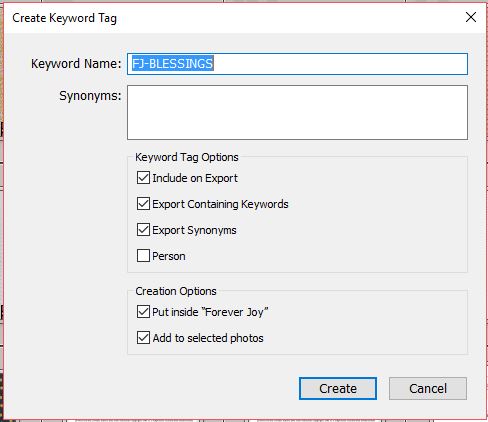
- Press CTRL+V to paste the folder name (ex. FJ-BLESSINGS). Make sure Add to selected photos is checked; click Create.
- Now to add the kit name. Right-click 00. Life Art Keywords -> Kit and choose Create Keyword Tag inside Kit.
- Name it “kit – (kit name)” (ex: kit – Blessings). Make sure Add to selected photos is checked; click Create.
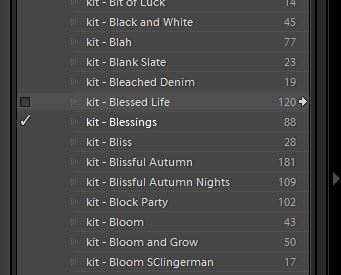
In less than 20 seconds, all the files in that folder have been tagged with the designer name (Forever Joy), the kit code (FJ-BLESSINGS), and the kit name (kit – Blessings).
5. Tag preview images
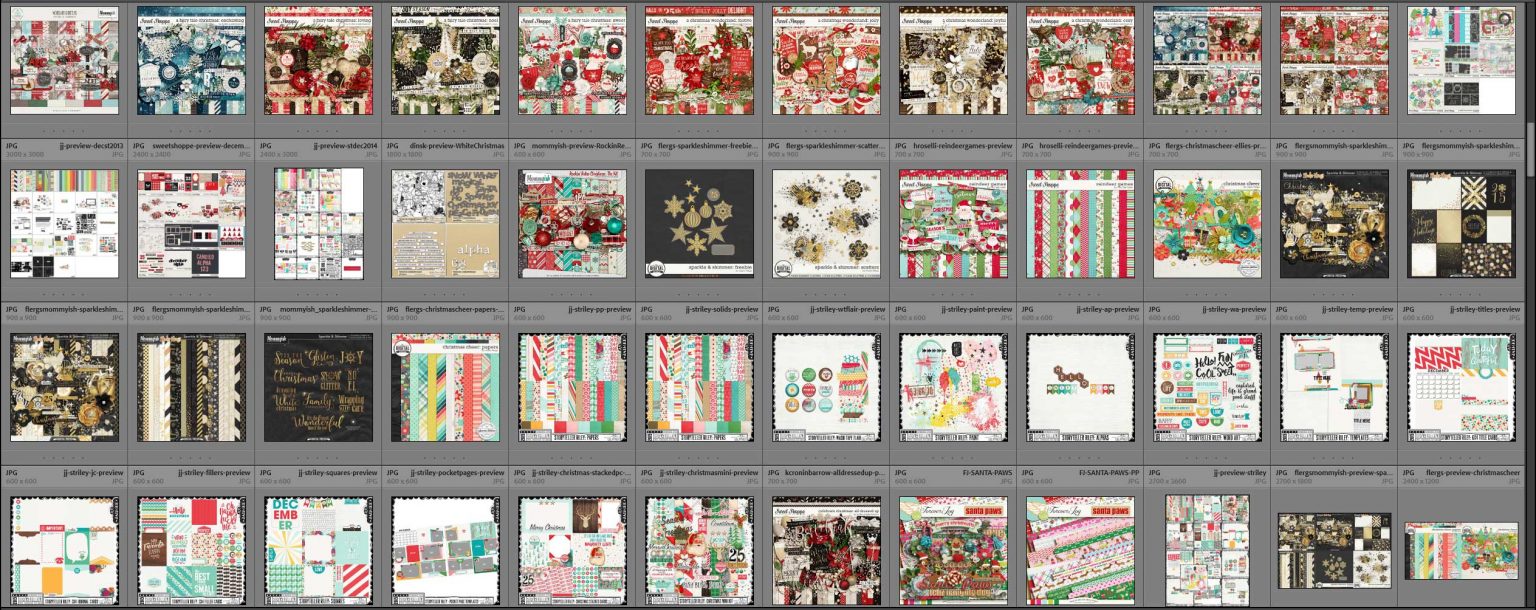
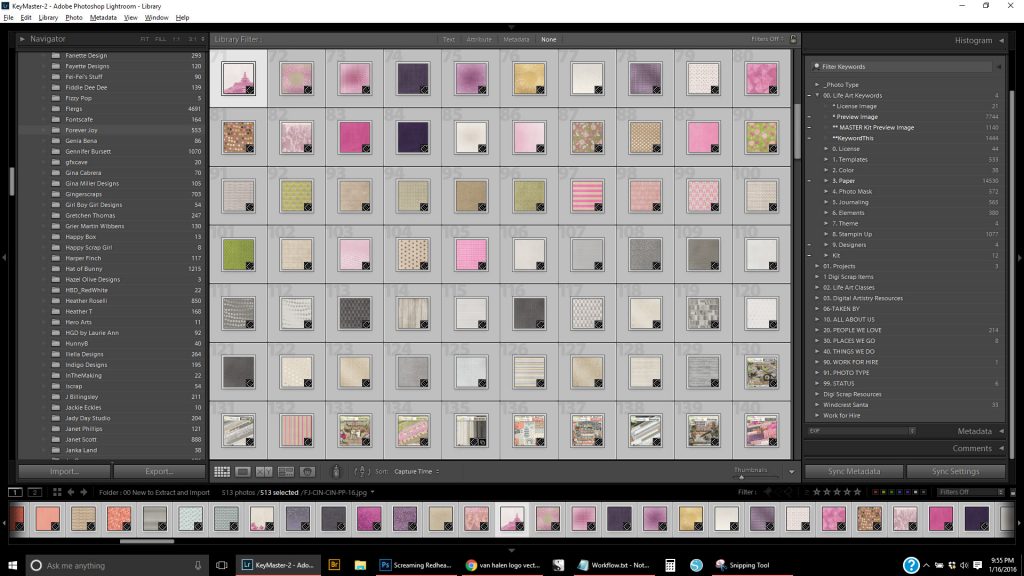
Next, I find and select all the preview images in the kit. There will always be at least one, but many designers will now include multiples – one of papers, one of elements, one of alphas, one of journaling cards, etc.
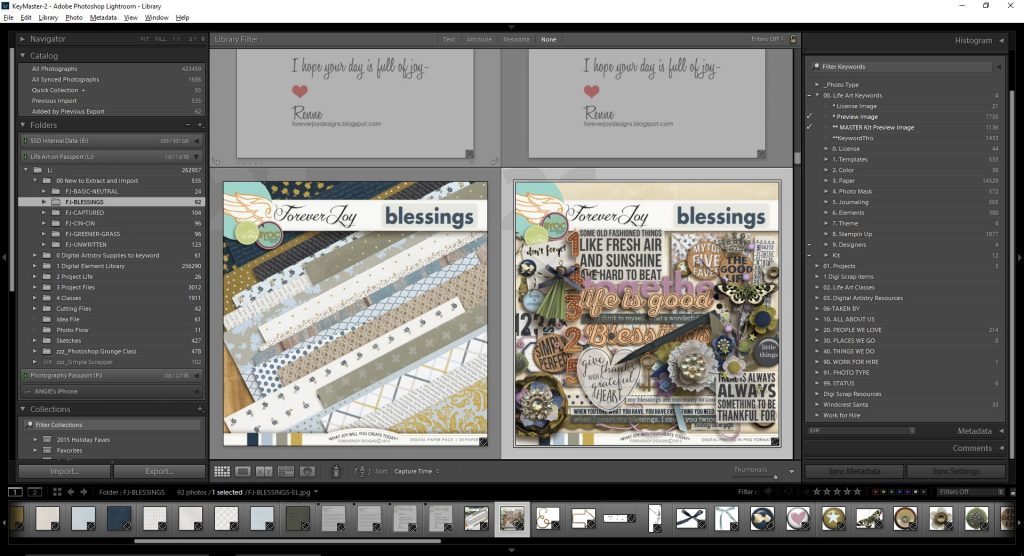
I add two keywords to all the previews – *Preview Image and *Keyword These – by clicking on them in the keyword list.
Then, I select the one preview image that best represents the kit as a whole, and tag it with *Master Kit Preview Image.
6. Move all files into designer folder
I don’t maintain individual folders for kits or collections. Instead, I drag all the files and drop them into the designer’s folder under 1 Digital Element Library. Don’t worry – because we keyworded all the files with kit names, we can easily get back to just the files in that kit. I promise!
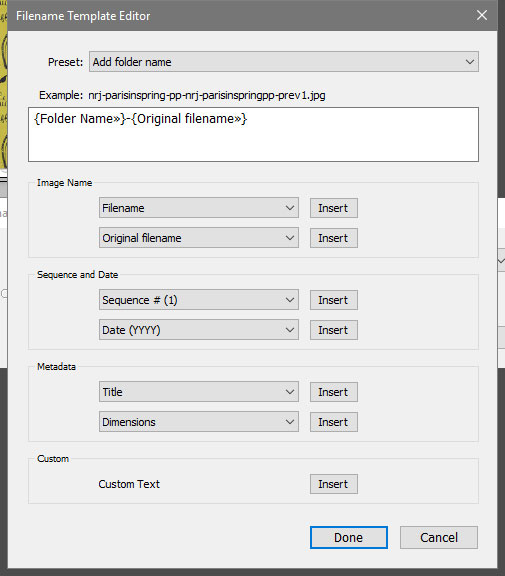
NOTE: Some designers name their preview files FOLDER.jpg rather than giving them unique names by the kit. Since everything’s going to be moved into a single folder, the files have to have unique names. I use Lightroom to rename them by pressing F2. I’ve set up a Filename Template for Previews using the mask <foldername>-preview
Then drag-and-drop all the files into the designer folder under 1 Digital Element Library.
7. Remove alpha images
A new step I added recently – once the files have been moved into the designer folder, I select all alphabet images, press DELETE, and choose REMOVE to remove them from the Lightroom library but not delete them from disk. My Lightroom catalog had ballooned to include over 272,000 digital element files. Despite frequently optimizing the catalog, it was moving. So. Slow. By removing the alpha files, I shrunk the library to 176,000 digital element files – and though I’m more of a font+style girl, if I want to use any of the alphas, I can access them through file explorer. You’ll learn how in this post.
8. Add detailed keywords to previews
At this point, the new supplies have been quickly integrated into my main library. I still need to add specific keywords to the preview files, but I generally batch these for later. I try to spend a couple 15-minute blocks throughout the day keywording my previews, and if I’m sitting in front of the TV with my laptop, I can get a hundred or so done in an hour.
I have a Smart Collection for all the “NEW kit index to keyword” previews:
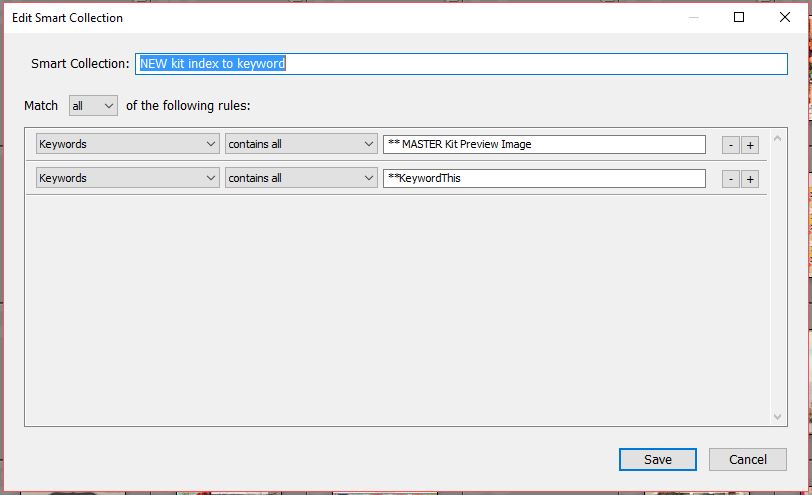
That pulls up all the previews I have yet to keyword. One by one, I’ll add Color and Theme keywords, and then remove the tag **KeywordThis.
Here’s a few examples:
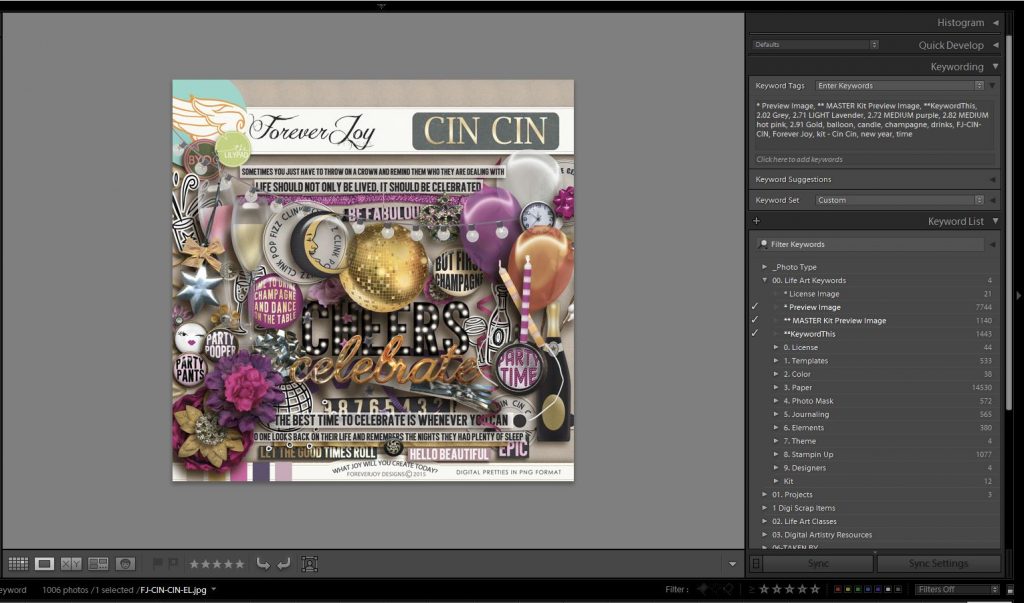
For this kit preview – Cin Cin by ForeverJoy – I added detailed keywords for color (2.02 Grey, 2.71 LIGHT Lavender, 2.72 MEDIUM purple, 2.82 MEDIUM hot pink, 2.91 Gold) and theme (balloon, candle, champagne, drinks, new year, time).
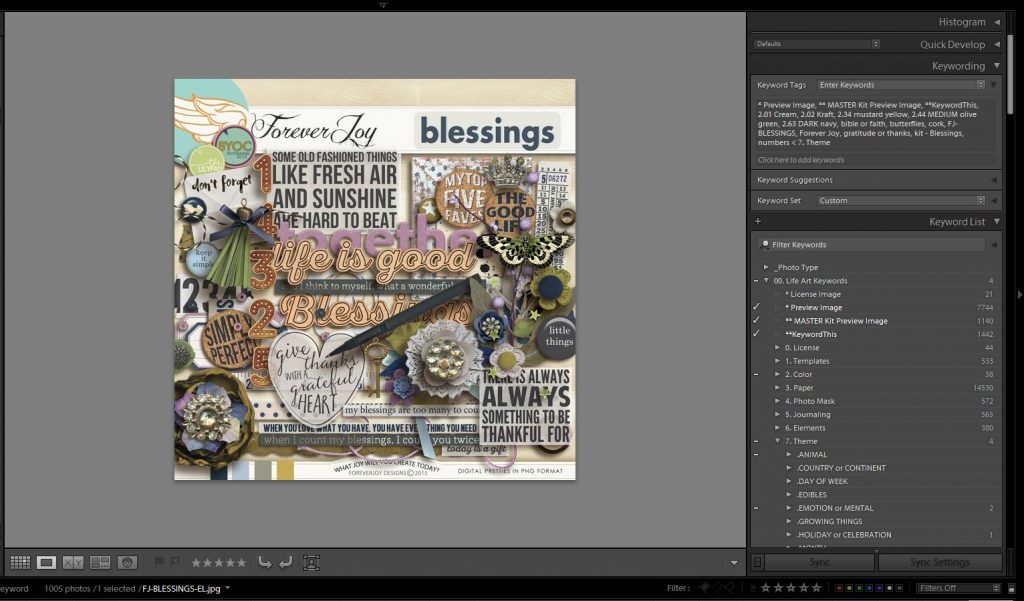
For this kit preview – Blessings by ForeverJoy – I added detailed keywords for color (2.01 Cream, 2.02 Kraft, 2.34 mustard yellow, 2.44 MEDIUM olive green, 2.63 DARK navy) and theme (bible or faith, butterflies, cork, gratitude or thanks, numbers).
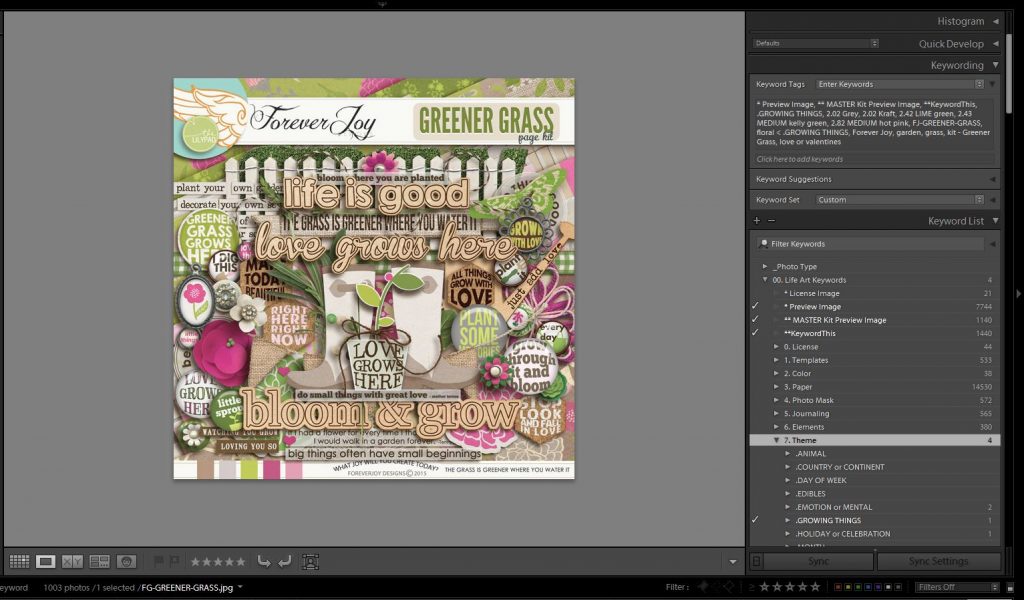
For this kit preview – Greener Grass by ForeverJoy – I added detailed keywords for color (2.02 Grey, 2.02 Kraft, 2.42 LIME green, 2.43 MEDIUM kelly green, 2.82 MEDIUM hot pink) and theme (floral, garden, grass, love or valentines).
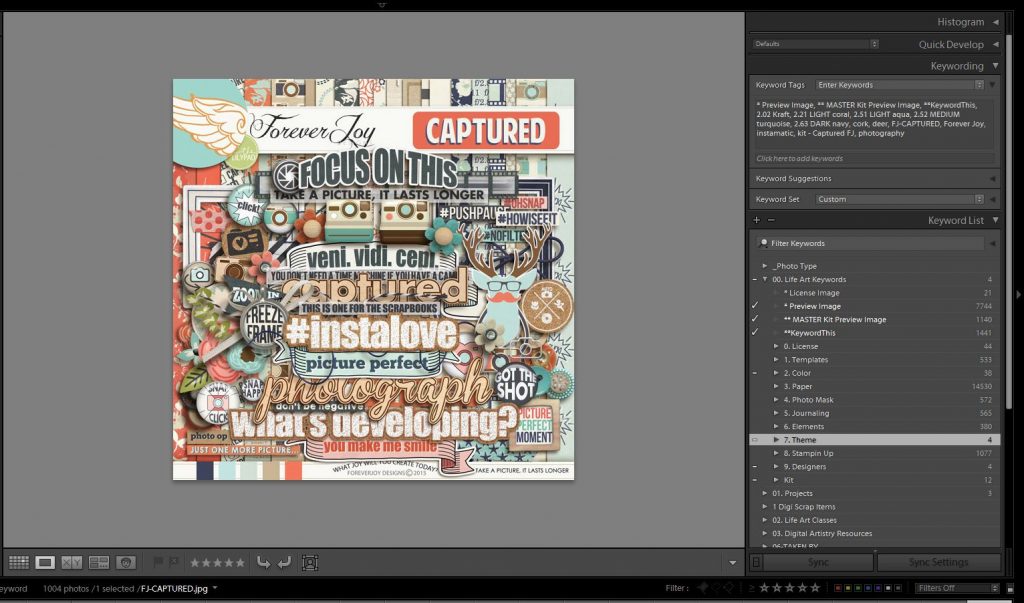
For this kit preview – Captured by ForeverJoy – I added detailed keywords for color (2.02 Kraft, 2.21 LIGHT coral, 2.51 LIGHT aqua, 2.52 MEDIUM turquoise, 2.63 DARK navy) and theme (cork, deer, instamatic, photography).
You get the idea!
Feels like a lot of work?
It’s really not. Especially given the payoff. Just wait till you see how I use my stuff!
 Digital Scrapbooking Supply Nirvana
 »
»
[…] In this post, I shared my workflow and showed how I add new supplies to my library. […]